Scubase® Frequently Asked Questions (FAQ)
Here are the answers to the most frequent questions received by Scubase Support. If you do not find your answer here, consult the extensive Scubase on-line help. It is a full-blown on-line documentation that explains the details of every Scubase feature.
Configuring Microsoft® SQL Server 2008 for use with Scubase®
I cannot log in to Scubase. What should I do?
Using Scubase®
Is there a place to keep track of my dive buddy addresses, phone numbers and certification numbers?
The numerical order of my dives is wrong. How do I renumber them in the chronological order?
How do I change the units to metric/US?
How do I download dives from my dive computer to Scubase?
Configuring Microsoft SQL Server 2008 for use with Scubase
This error is a result of the Windows security settings. SQL Server 2008 is a Windows service running under the built-in Network Service account by default. The Network Service account cannot access certain areas of the disk, notably My Documents and Desktop. In general, do not use the Desktop folder to save Scubase related backup files and packs. Access to files on remote computers may also be restricted.
There are three ways to solve this. Option 1 is not recommended as a long term solution. Option 3 may be the most convenient for a stand-alone PC:
-
Option 1: Move the backup or pack file to a folder with enough access privileges. The designated SQL Server backup folder \Program Files\Microsoft SQL Server\MSSQL10-50.SQLEXPRESS\MSSQL\Backup should always work. Or create a new folder outside the Documents and Settings area, such as C:\Scubase Backups.
-
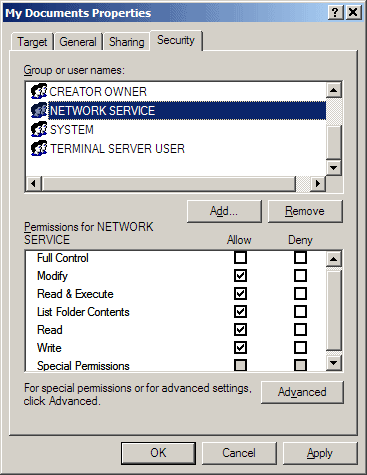
Option 2: Give the NETWORK SERVICE account read/write access to your My Documents folder or its sub-folder. Right-click the folder, choose Properties and on the Security tab add NETWORK SERVICE and allow Modify/Read/Execute/List/Write for it.

Note that the Security tab is not available if your system is in the Simple File Sharing mode (this mode can be temporarily changed in Tools->Folder Options->View in the Windows Explorer).
-
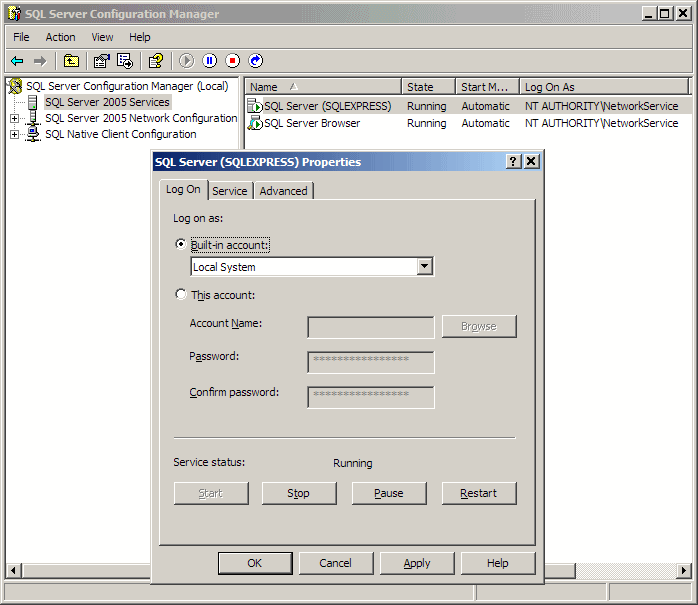
Option 3: Change the SQL Server 2008 Log On account to Local System. This will give SQL Server access to your entire hard disk, but will further restrict the ability of SQL server to directly backup to network drives, which does not matter on a stand-alone PC. To do this, perform the following steps:
-
Choose: Start->All Programs->Microsoft SQL Server 2008->Configuration Tools->SQL Server Configuration Manager.
-
Under SQL Server 2008 Services right-click the SQL Server (SQLEXPRESS) item, choose Properties.
-
On the Log On tab, set Built-in account to Local System. Click OK.
-
Confirm SQL Server restart when prompted. Verify that the Log On As value has changed to LocalSystem in the services list.

-
There are two most common causes of this problem:
A. Disabled communications protocol between Microsoft Native Client and Microsoft SQL Server. To correct this problem, follow these steps:
Choose All Programs->Microsoft SQL Server 2008 R2->Configuration Tools->SQL Server Configuration Manager.
In the left pane, navigate to SQL Server Network Configuration->Protocols for SQLEXPRESS In the list on the right, if TCP/IP, Shared Memory or Named Pipes are disabled, right-click them and choose Enable.
In the left pane, navigate to SQL Native Client 10.0 Configuration->Client Protocols. In the list on the right, if TCP/IP, Shared Memory or Named Pipes are disabled, right-click them and choose Enable.
Reboot the PC. Start Scubase.
B. The software firewall is not configured to allow SQL Server traffic or the Microsoft SQL Server Browser not running. This Microsoft bulletin gives instructions on starting the SQL Browser and configuring the Windows firewall. All firewalls (including third party such as Norton) will need to create exceptions and allow traffic in both directions for all of the following programs:
-
sqlservr.exe (C:\Program Files\Microsoft SQL Server\MSSQL10-50.SQLEXPRESS\MSSQL\Binn\sqlservr.exe)
-
sqlbrowser.exe (C:\Program Files (x86)\Microsoft SQL Server\90\Shared\sqlbrowser.exe)
-
scubase.exe (C:\Program Files\Scubase\scubase.exe)
The first two programs may be in different locations depending on your SQL Server and Windows versions. Search for sqlserv.exe and sqlbrowser.exe in c:\Program Files and c:\Program Files (x86) if they are not in the above specified paths.
By default, SQL Server 2008 uses Windows Authentication Mode. In this mode both Login Name and Password in the Scubase Login window should be left blank (the login credentials will be inherited from your Windows login). Initially, only members of the Administrators group will be able to connect to the SQL Server and use Scubase.
If you are not logged in to Windows as a user with administrator privileges, you will need to use SQL Server Management Studio to grant SQL Server access to your Windows login account. To install SQL Server 2008 Management Studio Express download it from Microsoft here: SQL Server 2008 Management Studio Express. The file to download for 32 bit Windows is SQLEXPRWT_x86_ENU.exe.
To grant SQL Server access to a Windows login account, perform the following steps:
Log into Windows with administrator privileges.
Choose: Start->All Programs->Microsoft SQL Server 2008->SQL Server Management Studio Express.
Connect to Server with Windows Authentication.
Navigate to Security->Logins. Right-click the list and choose New Login.
On the General page, enter the new Login name in the form PCNAME\WINDOWSUSER. Or use Search->Advanced->Find Now to locate the user name. Make sure Windows authentication is checked.
On the Server Roles page check sysadmin (For more refined access control you would have to grant database-level privileges. Consult the SQL Server Management Studio help for more details).
Click OK, close Studio.
Login as the new user to Windows. Log into Scubase with the Login Name an Password blank.
Using Scubase
The Diver Explorer has been designed exactly for that purpose. Go to View->Divers on the Dive Explorer menu. Add your dive buddies as additional divers. You can include their contact information and pictures. You can even send them e-mail directly from the Diver Details window.
The diver certification information can be entered on the diver Memberships and Certifications tab together with dive insurance and dive organization membership data. For your own certifications, you can optionally scan your c-cards and insert them into the Diver Details window as pictures.
Go to Tools->Renumber->Dives on the Dive Explorer menu. Choose the diver whose dives should be renumbered and the new initial dive number (in case you do not have all your dives logged in Scubase). All dives for the specified diver will be renumbered chronologically.
Note that you can also set the initial dive time in the Diver window to get the Bottom Time to Date right in case not all of your dives are logged in Scubase.
First, go to Tools->Options on the Dive Explorer menu. Select the desired Unit System and Temperature Unit in the Import Units box. This will ensure the proper data conversions upon import from the dive computer software. It will also determine the units for the dive calculations, the depth units on the Dive Profile charts, and the altitude units in the Site window.
Second, go to Tools->Form Designer to change the units displayed in the Dive and Trip Summary and Details tabs. Double-click on each field for which you want to change the units and change the Suffix field to the unit of your choice. Of course you can also delete the field completely and add a new one that fits your needs.
The rest of the locale-specific options, such as date formats and decimal separators are picked up from your Windows configuration.
Note that changing Scubase units will not recalculate the existing data. It is advisable to set the units prior to logging your dives in Scubase. See Help->Quick Start Guide for the recommended steps to take when starting to use Scubase.
Downloading dives from your dive computer is accomplished via software provided by your dive computer manufacturer. First you download the dives from your dive computer into the dive computer software. Then you import the dives from the dive computer software into Scubase. With some dive computers, you need to export the dives from the dive computer software to an export file or a DAN Project Dive Exploration file before importing them into Scubase. Please see the instructions for your particular dive computer model in the Scubase Help topic Using Scubase ->Importing Dives.
If you have ReefNet Sensus Pro or Ultra dive data recorder, you can download dive data from this device directly into Scubase.
We have received numerous requests for implementing direct download from other dive computers. Regretfully, we cannot do this for liability reasons.
This can only happen on Windows XP. Choose Start->Run from the Windows menu. In the Open box, type: regsvr32 scrrun.dll. Click OK. A message should appear that the registration succeeded. If it does not, download and install Windows Script from Microsoft.
Back to: Support